4.1.1. Lab 1 - Creating and Implementing an LX iRule
4.1.1.1. Test and Review the Existing Configuration
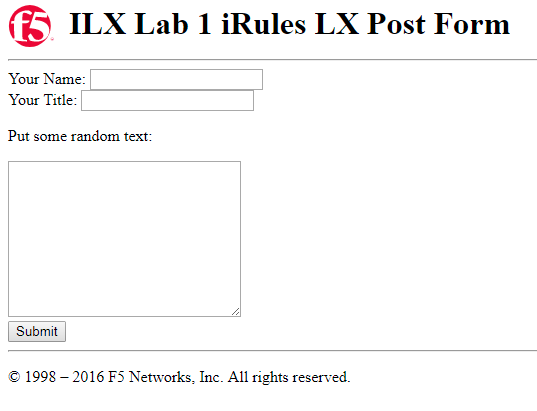
To start off we have a web application that has a web form that we enter some information into and submit. Now lets look at the web app at the URL http://10.0.0.20/ilxlab1/ (Lab 1 on bookmarks). The response of the POST will show our form data and “Content-Type” header. Here is the example of the web form –
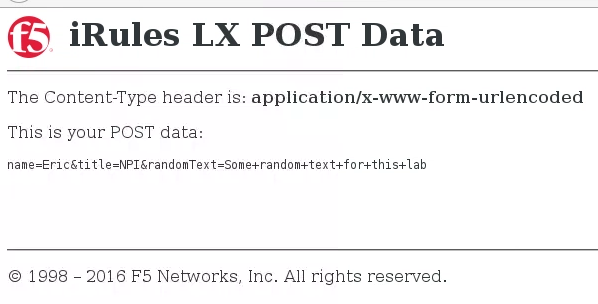
Go ahead and run your own test of the web app. Observe the “Content-Type” header and POST data values. Here is an example of the response to a POST.
Go ahead and run your own test of the web app. Observe the “Content-Type” header and POST data values. Here is an example of the response to a POST.
4.1.1.2. Create the LX Workspace
The first thing we need to do is create an LX Workspace. On the desktop, navigate over to the LX workspaces menu in the tab located at Local Traffic > iRules > LX Workspaces. Then select the create button at the top right of the table and name the workspace ilxlab1. You will now have an empty workspace.
4.1.1.3. Create the Extension
Next, we create a new extension (the Node.js code that will run). The name of the extension will matter later because we will call that from our iRules TCL code.
To create the extension, click the Add Extension button at the bottom of the editor, then give it the name ilxlab1_ext. The various files of the extension will show up. Select the index.js file and you should see a template of example code in the editor window. Normally you could use this example code as a starting point, but in our case we should delete all the example code from the window. In the Atom editor, locate the file named ilxlab1.js and double click it which should open it in a text editor. Copy and paste this into the index.js file on our BIG-IP.
Just for reference, here is the code:
1 2 3 4 5 6 7 8 9 10 11 12 13 14 15 16 17 18 19 | 'use strict' // Just for best practices
// Import modules here
var f5 = require('f5-nodejs');
var qs = require('querystring'); // Used for parsing the POST data querystring
// Create an ILX server instance
var ilx = new f5.ILXServer();
// This method will transform POST data into JSON
ilx.addMethod('jsonPost', function (req, res) {
// Get POST data from TCL and parse to JS object
var postData = qs.parse(req.params()[0]);
// Turn postData object into JSON and return to TCL
res.reply(JSON.stringify(postData));
});
//Start the ILX server
ilx.listen();
|
Then you will need to save the changes to this file with the Save File button at the bottom of the editor window.
4.1.1.4. Create the TCL iRule
Next, we need to create the TCL iRule that will call our Node.js code. Click the button Add iRule at the bottom of the editor window, name the iRule json_post and don’t check the box to include example code (we don’t need the example code for this lab). In the Atom editor, locate the file named ilxlab1.tcl a. Copy and paste this into the json_post iRule file.
Just for reference, here is the code.
1 2 3 4 5 6 7 8 9 10 11 12 13 14 15 16 17 18 19 20 21 | when HTTP_REQUEST {
# Collect POST data
if { [HTTP::method] eq "POST" }{
set cl [HTTP::header "Content-Length"]
HTTP::collect $cl
}
}
when HTTP_REQUEST_DATA {
# Send data to Node.js
set handle [ILX::init "ilxlab1_pl" "ilxlab1_ext"]
if {[catch {ILX::call $handle jsonPost [HTTP::payload]} result]} {
# Error handling
log local0.error "Client - [IP::client_addr], ILX failure: $result"
HTTP::respond 400 content "<html>There has been an error.</html>"
return
}
# Replace Content-Type header and POST payload
HTTP::header replace "Content-Type" "application/json"
HTTP::payload replace 0 $cl $result
}
|
Then you will need to save the changes to this file with the Save File button at the bottom of the editor window.
4.1.1.5. Create the LX Plugin
Now that we have our code in a workspace, you will need to navigate over to the LX Plugins menu in the tab located at Local Traffic > iRules > LX Plugins. Click the Create button, name the plugin ilxlab1_pl, select the ilxlab1 workspace and click Finished. This makes the Node.js code active.
4.1.1.6. Apply the LX iRule to the Virtual Server
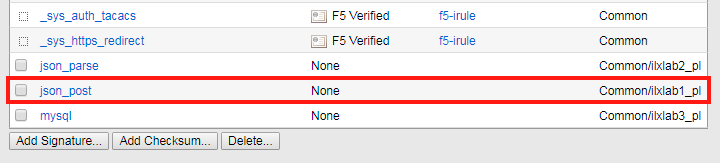
Now that we have our Node.js code running, we can put it to use. In order to use the code from the plugin we must assign the TCL iRule to a virtual server. Just so we can be familiar with it (but it is not required), we will look for the TCL iRule in the Local Traffic > iRules > iRules List menu. You will find the iRule that we created in the workspace located there with a Partition/Path that has the same name as our plugin.
You wont be able to make changes from here. This is the same behavior as an iApp with strict updates enabled.
Now navigate over to our virtual server list, click the Edit button (under the resources column) for the virtual ilxlab1_vs and select the Manage button for iRules. If you scroll to the bottom of the available iRules list, you should see the iRule from our plugin.
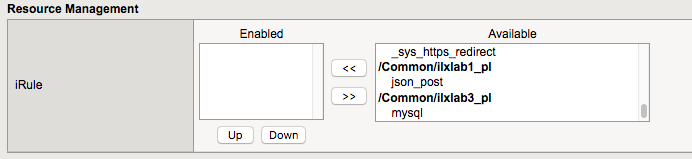
Move this iRule to the over to the enabled section and click finished.
4.1.1.7. Testing the LX iRule
Now let’s navigate to the second tab on the browser with the web page of our app. Go back to the web form and submit the information again. You will see now that the data has been converted to JSON and the Content-Type header has been changed.
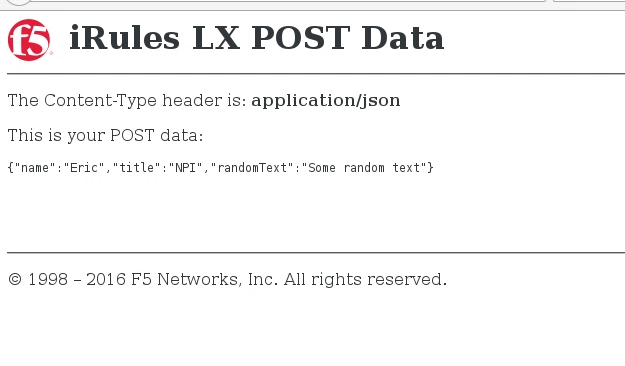
As you can see, with iRules LX we can implement solutions with very few lines of code. If we wanted to accomplish the same goal in TCL alone, it would most likely take several hundred lines of code.
4.1.1.8. Workspace Package Management
Lastly, we will show package management for LX workspaces. While it is fairly simple to move TCL iRules from a dev/test environment to production because it is a single file, iRules LX can have an almost unlimited number of files depending on how many NPM modules a solution needs. Therefore, workspaces have been given the ability to export and import packages as a tgz file to have a more convenient method of transporting iRules LX code. In this exercise, we will export our package and import it back into the same device (but normally import would happen on a separate BIG-IP).
4.1.1.8.1. Export/Import a Workspace
Go to the LX Workspaces list, check the box of our ilxlab1 workspace and click the Export button below the list. This will save the file to the user’s Downloads folder.
Now click the Import button on the top right hand corner of the workspace list. On the next window give the imported workspace the name of ilxlab1_restore, select the option Archive File, and use the Choose File button to find the tgz file in the user’s Downloads folder. When you click the Import button you will be taken back to the workspace list and you should see the imported workspace now. Feel free to navigate into the imported workspace.
You have concluded lab exercise #1.